| |
|
Click an image to enlarge. |
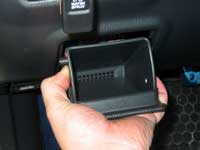
Next we will change the Intercooler Water
Spray Button. To do this, open the change tray on the left under the
button. Then press in the left side (where my thumb is). There is
a small peg there, so when you push it in, the whole change tray will
come out revealing the fuse box.
Reach up into the hole and push your the I/C button from the back.
There is a tab at the bottom that is a bit of a pain to get loose.
You may want to get a screw driver to push on the tab while you push
the button from the back. It should eventually just pop out.
Unplug the wiring harness so you can get the button out completely. |
|
 |
|
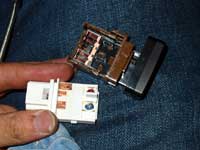
First you must separate the black/brown
section from the white section. To do this, use your fingernail or
a small screwdriver to pry open the edges of the brown. You will see
little bumps on the white piece that fit in holes in the brown part.
Be careful as the button has a few loose parts in it (the metal contacts
and the button spring) Make a good note of how it comes apart so you
can put it back together again.
Now, the black button should easily separate from the brown plastic. |
|
 |
|
Stick your finger into the back of the
black button and push the little plate that says "I/C Water Spray"
and it should come off. You'll see on the back that there is some
green stuff on it. This needs to be scratched/sanded off. You can
use a screw driver or some fine sand paper. When it's scraped off,
put some new glue on the plate and stick it back on the button.
Now, get another LED condom and slip it over the LED.
Re-assemble the button and then test to make sure it works. I found
the light to be a little bit dim. I might change it to red instead. |
|
 |
|
| HVAC
Lights | Intercooler Light | Keyring
Light |
|
|
| |
|
|


